

Ever thought about how a simple change can make your room feel totally different? Well, it’s time to consider the impact of giving your doors and architrave a fresh look. You don’t need a fancy toolbox – just some basic tools and the guidance we’ve got lined up for you. We got our architrave from Skirting World (stay tuned for a quick review) and picked up our doors from B&Q – so you know similar options are right around the corner!

You’ve probably noticed how door frames can start looking tired and worn out, especially when they’ve seen layers of paint come and go. Plus, bumps and bruises over time can turn them into an eyesore. But fear not! This simple and speedy DIY project is here to save the day, giving your entrances and exits the makeover they deserve. Slap on a new door onto that frame, and bam! Your room is looking like a whole new ballgame. So, let’s dive into how we swapped out our architrave and doors, and get you inspired to do the same.
How to replace door architrave
If you’re wondering how to replace white door architrave then read on. Below is a guide from handyman Ben on how to replace your white door architrave with new.
Remove your door
The first step is to remove the door from the hinges. This should be simple enough with a Philips or Pozidriv screwdriver. Use a drill/drive to speed things up.

How to remove architrave
Start with a utility knife (Stanley knife) and run it around the outer edge of the architrave to break the caulk seal. Repeat this process for the inner edge.

Gently tap in a wide chisel working your way around the edge of the architrave. Slowly ease and pry the architrave away from the wall and frame being careful not to damage any plaster or the door frame.


There might be small sections where the plaster gets damaged. Fear not, these can be repaired with some wall filler or fresh plaster.


How to prepare the wall for new architrave
For the best results, you should repair any damaged sections of the wall before continuing. Use a wall filler to fill in any holes or imperfections. Wait for this to dry before moving to the next stage.
Gently sand the dried filler for a smooth finish. The wall can then be repainted with a matt emulsion.
How to fit new door architrave
Measure ~8mm in from the edge of the door frame and mark it with a pencil. Now measure from the floor to the marked line. Cut the architrave at a 45-degree angle using a mitre saw. Electric or manual is suitable. Ensure a clean cut.


Apply some adhesive (skirting adhesive or all-purpose adhesive) to the back of the architrave and place it onto the door frame. Gently tack the architrave onto the wooden frame with thin lost head nails. You can use a small nail punch to ensure the nail sits beneath the surface of the wood. This allows the hole to be filled and sanded.


Start by cutting and fitting the two long side pieces of architrave. Next, measure and fit the smaller top piece of architrave.
How to get a perfect finish on your new door architrave
Use a caulking gun and caulk along the very edges of the architrave to disguise and seal any gaps, ready for painting. After running the caulk down with the gun, use a finger to carefully smooth down the caulk for a perfect finish.
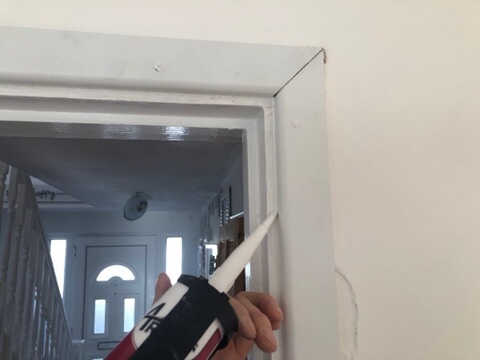


Also us a tiny bit of caulk to fill in the holes from the nails.

Caulk dries quite quickly. You should be able to paint the whole frame after about 3 hours. Most door frames will be painted with glossy or eggshell paint.
Replace or fit new doors
You can now refit your existing doors or opt for a new door. We replaced our doors to complete the look. By lining up the existing door hinge and cylinder location we cut and fitted these nice new farmhouse-style doors.
Ta-da!


Our living room makeover story
We’ve been giving our living room an almost total makeover. It’s unrecognisable from the room that was here when we bought the property. Within the first year of moving in we painted over the dated artex ceilings and walls, replaced white vertical blinds with horizontal real oak blinds, removed black iron light fixtures and replaced with spotlighting and hanging pendant lighting over the dining table, ripped up the cheap laminate flooring and put down thicker oak effect planks. The removal of the old-fashioned stone and concrete fireplace and wall surround made way for a remarkable transformation, creating a stunning and inspiring fireplace setting
Phew!
We hated the dated artex, but we only had so much budget so decided to paint it all white and live with it for the time being. That time has now ended and we finally had it removed a few weeks ago and the walls and ceilings plastered. It took around one week to dry, but then we had a holiday for six days, so we only just got around to painting the room. We’ve practically had no living room or dining for over three weeks now! We have a living room / dining room in one.

We decided to also paint our skirting boards white to elongate the walls. We live in a chalet bungalow with low ceilings downstairs, but normal upstairs. I’m not really a fan of the low ceilings and wish we had tall ceilings downstairs. There are lots of tricks to make a low ceiling room feel bigger such as investing in window dressings that accentuate the space from bespoke curtain makers London who will be experts in knowing how to make a window feel taller. We did fit wooden skirting when we moved in, but this made the room feel shorter. We decided to paint this white to lengthen the walls and give the impression of taller rooms downstairs. Plus this white skirting will look much better with the white architrave we have from Skirting World.
As the living room will feel so much fresher and modern with the dated Artex gone and freshly painted, I didn’t fancy putting our old sofas back in the room or even the old door.
When moving we quickly bought some ‘these will do’ sofas from an outlet instead of choosing some we really liked. We’ve now ordered some bright orange sofas instead. These are the first sofas I’ve ever properly chosen for my house and I’m 34 years old! I’m so excited!
One has arrived, but it’s still in the wrapping whilst we decorate and the other is due soon. We have chosen a slouchy sofa for one side of the room and a cool retro sofa to go opposite. It’s going to look great.
When we moved in to our home we replaced all the doors, but made a mistake.
The doors here were all different and big board type doors. They looked awful and many had layers of paint on from the years.
We chose wooden doors, but literally got the cheapest available at around £25 per door. As the saying goes ‘buy cheap, buy twice’.
All our doors warped and some of them have never been able to close!
Now we are going to replace the doors for some slightly pricier white doors that are stronger and already finished so they shouldn’t warp. We’ll actually be able to close our bedroom door for the first time ever!
We will start with replacing the downstairs doors as the living room is our project right now.
Replacing our door architrave with Skirting World
Another job we had avoided and put off was the architrave. It looks years old and with several layers of paint on it, dirt and chips.
Ben’s original plan was to sand it all back and repaint it. A job that is very time consuming and will make a lot of mess. Needless to say, in just over five years of living here he has never got round to it!
Other jobs always seemed much more appealing!

We decided it was probably just best to replace the existing architrave with new architrave instead. It would save a lot of time and mess. Plus it would look a lot better.
Luckily it was as if Skirting World knew our dilemma with the doors and they reached out to offer us some architrave to review. The timing couldn’t have been better as we were already in the middle of our living room makeover!
They kindly sent us some door architrave so we have been able to replace our living room door architrave with new before we add our new doors.
Ben is no stranger to replacing architrave as he regularly replaces it for his customers. He works as a handyman and regularly updates homes with new architrave being a popular home improvement, especially in older style homes.
Just recently he replaced a customer’s architrave throughout and he commented on how much better it made the house look. This was his reasoning for us replacing ours now instead of trying to salvage what we already had!
Skirting World Review
There is a huge amount of choice for architrave designs at Skirting World. We wanted something very simple and chose one of their best sellers: bulldog MDF architrave. This is a very simple architrave that’s easy to clean. There are no inner grooves or places for dust to hide! It just has a slight rounded edge, but otherwise is a simple architrave strip with no fuss.
I was worried they didn’t have the size we wanted at 44mm wide as they only list 70mm and 95 mm on the website, but they informed me they cut all the architrave to size in-house so I was able to order 44mm. If you can’t see exactly what you need on their website then contact them to see if they’re able to custom make exactly what you need.

They were very helpful with my order and clearly know architrave inside out! I was also able to pick a delivery date and given a time window. This was confirmed by email and text before the delivery day and on the day itself. I was well informed throughout the whole process.
The architrave from Skirting World was exactly as ordered and their website offers great prices too. They say they offer the cheapest quotations without compromising on quality, so if you need architrave, door frames, skirting or window boards then give them a go. They’re super friendly in my experience and deliver on their promises.
The delivery arrived as expected and Ben got straight on with fitting the new architrave to our living room.
He’d already yanked off our old architrave when we were painting the living room and was ready to go!
Final thoughts on Skirting World architrave
Our new doors look so much better with the new architrave. It’s been a total door makeover!
As soon as Ben put the architrave on, before even fitting our new doors, I could instantly tell the difference. It looked fresher, cleaner and new. I don’t think we could have ever recovered the decades old existing architrave to this standard.
The customer service was top notch and the fact they can customise the architrave to your specifications if needed is really helpful.
Delivery was well informed throughout and on time.
We will definitely look at Skirting World next time we have any architrave, skirting board or window board requirements and Ben won’t hesitate to recommend them to his customers when they ask for suggestions.
Here’s the architrave we used: https://mdfskirtingworld.co.uk/architrave/bullnose-mdf-architrave/