If you work with timber, you will come across finger joints constantly, whether you notice them or not. They show up in worktops, structural panels, stair components, cladding, and even the framing timber used in modern construction. I have been working with wood for over 20 years and I still find them genuinely impressive when you understand what they are actually doing.

What is a Finger Joint?
A finger joint, also called a comb joint, is a woodworking joint that connects two pieces of timber end to end by cutting a series of interlocking rectangular tabs, or “fingers”, into each piece. The fingers slot together and are glued, creating a joint that runs the full width of the board.
The name is pretty self-explanatory. Interlock your own fingers together right now and you will see exactly what the joint looks like.

They are used throughout timber manufacturing, most visibly in solid-wood worktops. If you look closely at the end grain of an oak kitchen worktop, you will almost certainly see the telltale zigzag profile of finger jointing. We have solid oak worktops in our own kitchen, and the joints are clearly visible from the end. Once you know what to look for, you start spotting them everywhere.
One interesting fact that often surprises people: the finger joint is not just a carpentry technique. It is also used extensively in the timber structural products industry, where boards are finger jointed end-to-end to create long lengths of engineered timber without waste. The joint itself, when properly glued, can actually be stronger than the surrounding wood fibre.

Why are Finger Joints Used?
The short answer is surface area. By cutting those interlocking fingers, you dramatically increase the glue surface compared with a simple butt joint. A standard butt joint on a 100mm wide board gives you just 100mm x however-thick the board is of glue surface. A finger joint across that same board might give you ten times that area depending on the finger pitch. More glue surface means a stronger, more durable bond.
There is also a practical manufacturing reason. Finger jointing allows timber manufacturers to use shorter offcuts and defective lengths that would otherwise go to waste. Those pieces get jointed together into usable long lengths. That makes finger jointed timber more cost-effective and arguably more sustainable than clear straight-grained alternatives.
Advantages of Finger Joints
The advantages are well established, and in my experience they hold up in practice:
Strong bond: When glued correctly, a finger joint routinely matches or exceeds the tensile strength of the original timber. This is why they are trusted in structural applications.
Dimensional stability: Finger jointed panels tend to stay flatter than solid boards because the shorter individual sections are less prone to cupping and warping. The alternating grain directions across the panel also help balance out wood movement.
Cost-effective: Finger jointed timber uses shorter, lower-grade lengths that would otherwise be waste. This keeps the price down compared with clear solid timber while delivering comparable performance.
Widely available: Router bit sets for finger joints are sold everywhere and the joint is well within reach of a reasonably experienced DIYer with a router table. You do not need specialist machinery to cut them at home.
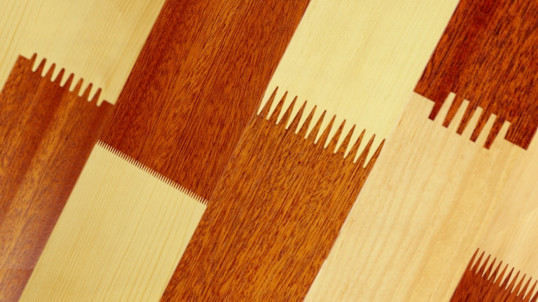
Versatile: They work in furniture, flooring, wall panelling, structural framing, and decorative applications. They can also be used purely decoratively, combining contrasting timber species to create striking visual patterns.
Disadvantages of finger joints
I think it is worth being honest here, because there are real limitations that some articles gloss over.
Visible seam: The joint is visible. On an oak worktop, the zigzag profile at the end grain is prominent and not to everyone’s taste. If you are after a seamless, continuous-grain appearance, finger-jointed panels are not the right choice. Alternatives like bookmatched solid boards or thicker slabs will serve you better aesthetically.
Difficult to plane or sand: The interlocking fingers create opposing grain directions at the joint. If you try to plane across a finger-jointed panel, you will tear out on one face or the other. This makes fine surface finishing more involved than with a simple edge-glued panel. I have found it is best to belt-sand with the grain, then finish with a random orbit sander to minimise any tearing.
Not all species are suitable: Some timbers, particularly brittle hardwoods or very resinous species, do not take kindly to being machined into finger profiles. The fingers can chip or split during cutting, which compromises the joint. For worktops and panels, oak, pine, and beech are well-suited. Highly figured or interlocked-grain species require more care.
Relies on the glue line: A finger joint is only as good as the adhesive and the quality of the fit. A poorly cut joint with gaps, or one assembled with insufficient glue, will fail under stress. This is worth noting if you are cutting your own finger joints at home. Accuracy in the cut and thorough glue coverage matters more here than in many other joints.
Making Your Own Finger Joints
You will need a router table. I use a floor-standing Trend unit in my workshop but a good bench-mounted table will do the job. The key piece of kit is the finger joint router bit set, which cuts the matching male and female profiles in a single pass when set up correctly.
A couple of things I would add from experience:
Set up on scrap first. Finger joint bits need precise height and fence alignment or the fingers will not register flush. Run test pieces until the fit is snug without needing force.
Use a good quality PVA or purpose-made finger joint adhesive. Standard woodworking PVA works well for indoor panels. If the joint will see moisture, use a waterproof or D3-rated adhesive.
Clamp evenly and leave overnight. Rushing the cure time is one of the most common reasons these joints fail.

Bench mounted router table

DIY router table accessories
Router table insert plate

Finger Joint Router Bits
Once you’ve got a suitable router table, the next piece of equipment you’ll need is the correct bits to achieve a finger joint. Finger joints can be created in several ways with a number of different bits so the overall design and style you want to achieve is up to you. Here are a couple of examples:

Boarder finger joint router bit

Yonico finger joint router bit
Final Thoughts
Finger joints are one of the most practical and widely used joints in timber manufacturing for good reason. The combination of strength, economy, and relative simplicity makes them a sensible choice for panels, worktops, and structural lengths. The limitations are real but manageable once you understand them.
If you are choosing a worktop or panel product and the finger jointing puts you off aesthetically, that is a completely valid reason to look elsewhere. But if you are after a strong, flat, cost-effective timber panel for a garden room, workshop, or interior project, finger-jointed boards will serve you very well.