

Welcome to my DIY veranda build guide. In this step-by-step guide I’m going to show you how to build a very solid veranda that is attached to the house. It’s essentially a lean to structure that provides a canopy, or covered area that can be enjoyed whatever the weather.
For this veranda roof, I’ve used 5mm solid polycarbonate sheets, which are very much like glass, but claim to be 20 times stronger. They are a great alternative to other roofing materials, which I will explain in more detail further on in this article.

If you’re working to a tighter budget, I’ve also built a veranda using corrugated roofing sheets for around £500. It uses the same frame construction but is simpler and quicker to roof. You can see the full build in my corrugated roof veranda guide.
Veranda, Canopy, Lean-To or Pergola: What’s the Difference?
People use these terms interchangeably, but they’re not quite the same. A veranda is attached to the house with a solid roof. A lean-to is the same structural idea (pitched roof against a wall), but often simpler or used for storage. A canopy is usually smaller and fabric-based, though the term gets used loosely for any covered outdoor area. A pergola traditionally has an open slatted roof rather than a solid covering. This guide covers the solid, attached version, but the frame-building steps apply to any of these structures.
Why Build a Veranda?
A veranda is a great way of extending your living space, creating a fluid transition from the interior to the exterior, and vice versa. It can provide a sheltered area in your garden that you can utilise all year round. By adding a suitable roof you will be protected from rain, snow and even direct sunlight with the addition of blinds or a shade sail.

Here’s a before and after slider so you can see the transformation.


How to Build a Veranda or Lean-To – Step-by-Step
Step 1. Planning the Size of Your Veranda
This is a very important step of the build. It’s going to determine the overall footprint of your covered outdoor area. I used a 3D rendering tool (SketchUp free) to help with this part of the project. It gave us an idea of what the veranda would look like and also helped us understand how the sun would cast shadows during the day.

You can skip the 3D rendering and instead mark out the area with string or pieces of wood to get a feel for the size of the veranda. Think about how high the veranda will be, how wide and how far it will protrude from the house.
Typical Veranda Sizes
| Veranda type | Typical width | Typical depth | Min. height |
|---|---|---|---|
| Small (1-2 person) | 2.4m | 1.8m | 2.1m |
| Medium (family) | 3.6m–4.2m | 2.4m–3.0m | 2.1m |
| Large | 4.8m+ | 3.6m | 2.1m |
My veranda is 4m wide and 3.6m deep. The height closest to the house is roughly 2.5m sloping down to 2.1m. There is a 36cm drop from the rear to the front, which works out to be about a 7-degree angle.

How to calculate your veranda roof pitch
To ensure sufficient run-off your veranda roof needs a 5 degree angle or above. To calculate this I used a triangle calculator like this one. https://www.omnicalculator.com/math/right-triangle-side-angle

This is an important tool. Not only will it give you the pitch angle (Angle α) of your roof but it will also show the length of the rafter (c). To calculate your pitch simply input the lengths (a) and (b) for your veranda and the rest will be calculated for you.

Veranda width & depth
The width of your veranda is up to you, but remember it can’t be wider than your house. The depth of the veranda again will be up to you. Just be careful, it’s not too short, as you won’t be able to fit much underneath, and protection from the rain will be minimal. Going too far will make your materials expensive and hard to support. The ultimate depth will be between 2.4m and 3.6m.
I’d recommend sketching out your design on a piece of paper before you get started, and make a note of all the materials you’re going to require. I’ll list what I have used below as a guideline.
Step 2. Buying Materials for Your Veranda
Once you have your plan sketched out it’s time to find your materials and get them ordered. It’s best to use C24 construction timber for the frame as this is the strongest wood for the job. Avoid C16 construction timber for this project, it won’t provide the required strength you’ll need. (Unless more supports are added)
Here is a list of materials I used for the wooden frame, and some useful links to where I purchased them. Most were purchased from Travis Perkins as their prices are very competitive and they offer free delivery.
Veranda Wooden Frame Materials
| Material | Quantity | Cost £ each (Mar 2022) |
| C24 Treated Timber 47mm x 100mm x 4.8m | 1 | £23.17 |
| C24 Treated Timber 47mm x 150mm x 3.6m | 5 | £25.98 |
| C24 Treated Timber 47mm x 150mm x 4.8m | 1 | £34.63 |
| Sawn Treated Timber Softwood Carcassing 25mm x 50mm x 4.8m | 4 | £5.47 |
| Fence Posts 100 x 100mm x 2.4m | 2 | £19.20 |
| Bolt Grip Post Support Bolt Down 100mm | 2 | £12.50 |
| Bolt & Nut M10 x 110mm Din Cup Zinc Plated (20pk) | 1 | £7.91 |
| Coach Screw M8 x 50mm Zinc Plated (5pk) | 2 | £2.96 |
| Coach Screw M8 x 100mm Zinc Plated (25pk) | 1 | £21.30 |
| Zinc plated screws 40mm x 5mm (20pk) | 1 | £2.78 |
| Brown Rawlplugs 30mm x 7mm (48pk) | 1 | £1.73 |
| TOTAL | £605.66 |
Here is a list of materials I used for the roof.
Veranda Roof Materials
| Material | Quantity | Cost £ each (Mar 2022) |
| Solid polycarbonate sheets 5mm (4000x1000mm) | 4 | £270 |
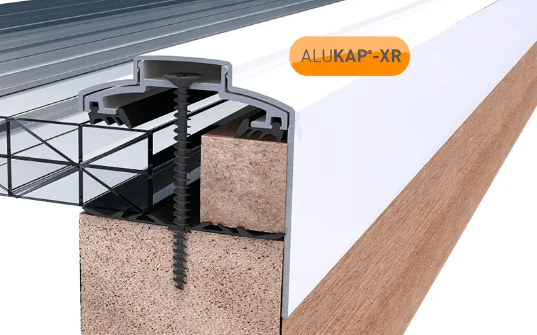
| ALUKAP-XR 45mm Aluminium Bar with End Cap in White – 3.6m | 3 | £85 |
| ALUKAP-XR 60mm Gable Bar White – 3.6m | 2 | £130 |
| Evo-stik Flashband Self Adhesive Flashing Tape Grey 100mm x 10m | 1 | £16 |
| Sponge Cord Black Foam Rubber Gasket – 4mm x 15m | 1 | £25 |
| TOTAL | £1636 |
Finishing Materials
To finish the veranda and protect the wood we used a Ronseal decking stain. This costs about £26.
Total cost of this veranda – £2,267.66
That is a fair chunk of money for a veranda, but I did shop around to find the cheapest materials. If you are looking to build a veranda on a budget, then take a look at my other post where I built a veranda for under £500. (back in 2018)
Step 3. Locating and Installing Bolt Down Post Supports
I started by marking out where the footing support posts (also known as a post shoe) were going to be located. As I have decking, I first removed a couple of boards so that my post supports could be anchored to the patio slabs underneath. (I could have mounted these on top of the decking, but it looks much neater when underneath.)

The post support (100mm) was secured to the patio slab underneath by drilling into the slab, inserting a brown Rawlplug (7mm) and screwing with a 40x5mm screw. I used a masonry drill bit (7mm) to drill into the slab.

I then replaced the decking. An extra piece of wood was required to support the decking wood on one side as seen in the image below on the left.


I wanted to leave enough space on my decking to walk around the end of the posts. (My decking is also 360cm long and I’m installing a dividing wall.) Therefore, I wanted the two support posts to be located 80cm in from the front edge.

Step 4. Cutting the Support Posts to Length
The support posts now need to be cut the correct length. This can be done with a hand saw. I have also cut a section so that the support beam can sit nicely onto the post. As seen in this image

Step 5. Fixing the House Support Beam
Using a long spirit level I drew a line on the house wall to indicate the height of the support beam. I then cut the beam (47x100mm) down to 4.2m and drilled 9 equally spaced holes along the timber. I used an 8mm drill bit for this.
The holes were then marked on the wall where I drilled and added Rawl plugs. The support beam was secured to the wall using 100mm coach screws.
Step 6. Cutting and Securing the Front Support Beam
I cut the front support beam (47x150mm) to 4.2m and created an angled cut at each end. (for decorative purposes.) The cut was 20x10cm.

I marked out the line with a pencil and cut with a hand saw.
I then lifted the piece into place, check the posts where straight by holding up a spirit level, then marked and drilled two holes in which I would insert the 110mm bolts.


I was very careful to ensure the posts met at an accurate right angle. This can be done by using a roofer’s square and checking the posts with a spirit level. Try strapping the spirit level to the side of the posts to make things easier. Of course, if you don’t feel comfortable doing this by yourself at any point in the process, you should consider hiring a roofing contractor who can help you with professional tips and tricks you won’t be able to do alone.
Finally, I cut a piece of wood (random off-cut) at 45-degree angles to secure and strengthen the front support posts for the veranda. These were simply screwed in at a 20-degree angle. Drill pilot holes first.

The wood was a slightly different colour, but this wasn’t an issue once stained.
Step 7. Cutting the Rafters
Be careful here. Timber lengths are rarely the exact length specified. With these 3.6m lengths, there are discrepancies by up to 3cm. My first job was to cut all the pieces to the same length, exactly 3600mm.

I then cut out the same 20x10cm angle (as in step 6) at one end. I used a hand saw, but you can also use a circular saw.

After each cut, I sanded the corners for a smooth finish.
Now, the timber end that touches the house needs a small cut at an angle. I used this piece from my table saw to draw the angle but you can also use a protractor.


For this, we want to use angle β from our triangle calculator. Which is 82.65 degrees. This doesn’t have to be an exact science. Just as close as possible.

You can also use one of these digital angle finders, which are not expensive on Amazon.
Trend 7 inch Stainless Steel Digital Angle Finder Ruler

- PRECISE MEASUREMENTS: Ideal for fitting skirtings, cornices, or shelves in alcoves, this 18cm digital angle finder offers easy-to-read markings for multiple uses in carpentry and DIY projects.
- ANGLE TRANSFER: The centre locking knob enables precise angle measurement transfer to table or mitre saws, ensuring an accurate and professional fit every time.
- SUPERIOR ACCURACY: Featuring precision-etched stainless steel blades and an LED display registering 0.1-degree increments, this angle rule guarantees precise readings.
I then wanted to notch into this so that the rafter would sit over the support beam on the house. I measured 4cm up and 4.7cm in (the size of the support beam). These were cut out using a hand saw.


I then measured the 281.3cm along the rafter (minus the bits I’d cut off) to locate the front support beam notch location. It’s actually better to mark these before you cut anything.

I then created some pocket holes so that I could secure the rafter to the support beams with screws. I used a Kreg Jig to make the pocket holes.


I then fixed the rafter in place at the very centre point on the two support beams. You will need to ensure the rafter is perfectly square so that the roofing sheets fit flush down each rafter.

You can then repeat the process for the remaining four rafters. The rafters will need to be placed accurately to ensure the roofing sheets fit perfectly. When fitting the roofing sheets, you will need to leave a 12mm gap for screws to be inserted. Clearer has some very useful resources on its website here.

You will notice the AluKap Gable Bar says to deduct 42mm. As I have used 47mm rafters, this would only leave a 5mm edge to support the roofing sheet, which felt too small. Instead, I decided to deduct less than this (30mm) and drill into the roofing sheet to secure it with screws. You can use a metal drill bit to drill into solid polycarbonate sheets.
So the spacing between each rafter needs to be 962mm. It’s a good idea to cut a piece of timber to 962mm and use this as a measure for each space. I used a piece of 25x50mm timber for this.
You should then have something that looks like this.

Step 8. Adding Roof Sheet Supports
The polycarbonate sheets can be quite flexible, therefore they need support in between the rafters. I cut 16 lengths of 25x50mm timber at 962mm. Created some pocket holes and installed them between the rafters at equal intervals.

Step 9. Securing the Roof Sheets
You’ll need to cut the rafter gaskets to length as they are delivered in one long roll. The rafter gasket is a 45mm wide rubber strip that sits on top of the rafter. This creates a water-tight soft seal between the wooden rafter and the polycarbonate glass sheet. There are two more smaller rubber gaskets that clip onto the aluminium bars that sit on top of the poly sheets. These should be installed now.
With everything ready, two people will be required to lift the polycarbonate panels into place. Once the first piece was up, I slid the rubber gaskets underneath each side and lined them up nicely on top of the rafter. Then the aluminium bar sits on top of the sheet and is secured in place with the provided screws.
To ensure the gable end pieces sat level, I had to cut some slim pieces of 5mm polycarbonate from the off-cuts. (Because I ordered cut-to-size 3.6m sheets from the 4m sheets.) If you don’t have any off-cuts, then you will need to source some 5mm wood or cut your own pieces. Here is an example:
The 3 middle bars were a little easier.

I made sure the front of the aluminium bars sat flush with the front of the rafter. There was a small gap by the house, but only a few millimetres. These were going to be covered by flashing tape anyway.
The end caps should be added before the top aluminium bars are secured in place. These will need to be screwed into the lower bar. I drilled a small 3mm hole in the correct location and fixed it with the provided screw.
The protective top aluminium bar simply clips on top. I used a rubber mallet to gently tap the bar securely all the way along each piece. I needed a ladder to reach all the pieces one by one.

I left the protective plastic layer on while working with the sheets to prevent any scratching, but I still had to be very careful. Here are some progress pictures:


Step 10. Sealing the Gap Between the House and the Roofing Sheets
To ensure a water-tight seal between the house wall and veranda roofing sheets, I used a flashing tape. This simply pushes onto the wall and the roofing and is semi-flexible, so it can be pushed over the aluminium bars. It then forms a water-tight barrier so that no water can run down the wall behind the veranda.
Step 11. A Dividing Wall
This part is completely optional. We wanted to provide a bit of a snug area, some protection from the elements and a bit of privacy on our decking and veranda area. To build this wall, I used 25x50mm pieces of timber. I fixed one up the side of the house and one up the support post. I then made two small 10mm spacers out of wood and slowly added pieces of timber to create this wall. To ensure a nice even spacing all the way along the wood, I added a middle support. It’s a nice finishing touch for the outdoor living space.


Step 12. Protecting the Timber and Finishing the Veranda
The final part of the project was to ensure the timber would last with a couple of coats of protective wood stain. We actually used a decking stain for this, as we had some left over. We used a Ronseal Country Oak decking stain.
Finally, we added our furniture, some plants and a couple of swinging chairs to make the space feel like home.


Thanks for reading this article. I hope it’s provided some useful guidance for your own project. If you are thinking of doing this yourself but have some questions, please feel free to leave a comment below (with your details), and I’ll get back to you as soon as I can. Likewise, feel free to leave a comment on what you think of this project.
Build Your Own Pizza Oven Kitchen
I’ve recently finished my own DIY pizza oven kitchen which really brings the whole veranda alfresco dining experience together.

How to build a DIY garden sofa and coffee table
Check out the latest addition to this veranda. A beautiful sofa and table set made from solid Iroko wood.

Do you Need Planning Permission for a Veranda in the UK?
Some verandas may require planning permission but the majority will not. Simply stick within these rules and you’re good to go:
- The raised platform must not exceed 300mm in height. (If you are building a decking area or raised platform this must not be higher than 30cm)
- No extension in front of the main elevation or side elevation fronting a public highway. (The veranda must be on the back of your house. Don’t build on the side or front.)
- The maximum height within 2000mm of a boundary shall not be greater than 3000mm. Or. The maximum height must not exceed 4000mm. (Keep it under 3m to be safe)
- The maximum depth for a single storey building must not exceed 3000mm for an attached building and 4000mm for a detached building. (How far can the veranda protrude from the house.)
- The total area of ground covered by the veranda must not exceed 50% of the land around the original house.
- Must not be wider than the existing building. (You can’t build the veranda past the side walls on the back of your house.)
How to Build a Veranda on a Budget
If you don’t have the money to invest in this project please take a look at my other veranda which I built for a fraction of the cost. You can save money on this project by opting for a cheaper roofing sheet material like corrugated polycarbonate sheets and the simple fixings that secure them.

Common Veranda Questions
Here are some common questions about verandas. I hope you find what you are looking for. If not, please feel free to reach out to me. I can’t promise I will know the answer, but there’s no harm in asking. (See comments section below.)
Does a Veranda Add Value to a House?
It most certainly does. You are essentially creating another living space in your home, an area that can be used for many purposes. Yes the veranda is going to cost money to build but this will easily be added to the value of the property. When you come to sell this will be an added feature and benefit for any potential buyer.
It is well known that by adding additional living space you can increase the value of your home by between 5 – 15%. Just make sure you maintain it properly, keep it looking clean and free from rot!
The addition of an outdoor heater can also make this space useable all year round. We added a Devola outdoor heater which is perfect for heating our sitting area.

Devola Electric Infrared Patio Heater

2400w
- INDOOR & OUTDOOR HEATER. Devola heater is IP65 waterproof rated for both indoor and outdoor use.
- QUICK & ENERGY EFFICIENT RADIANT HEATING. This patio heater has high heating efficiency and fast heating speed with advanced infrared technology. It has a high power of 2.4kW and can provide rapid and efficient heating for indoor or outdoor use.
- WiFi ENABLED SMART TECHNOLOGY. A stylish outdoor, smart heating unit, this high performance patio heater from Devola featuring four power settings, LED Display, Remote Control and 24hr Timer.
- PRACTICAL. The radiant heater from Devola is easily mounted on the wall and warms from above. Due to the infrared technology, the heat is radiated to people keeping them warm.
What Height Should a Veranda be?
Generally speaking, the veranda should be at least 2.1m to allow for suitable head clearance. This can be different at the house side, which is mostly higher to give a suitable pitch. Ours is 2.5m and 2.1m. You can, however, go higher if you wish, as long as you stay within the 3m (or 4m) restriction of planning.
What Wood do you use for a Veranda?
Most verandas are constructed from a C24 construction timber. These are available in different thicknesses, so make sure you get the correct thickness for your design. It’s the span between support points that you need to worry about. Take a look at this table for some further information on span widths and timber.
| Size of Rafter | Slope of roof <22 degrees |
| Breadth x depth (mm) | Maximum span |
| 47 x 100 | 2.08 |
| 47 x 125 | 2.74 |
| 47 x 150 | 3.4 |
| 47 x 195 | 4.59 |
What Tools do I Need to Build a Veranda?
Here is a list of the tools I used on this project. You may not need them all but it does make the job easier.
- Mitre saw
- Hand saw (9tpi)
- Kreg Jig and clamp
- Circular saw
- Drill driver and impact driver set
- Pencil
- Tape measure
- Hammer
- Chisel
- Rubber mallet
- Rafter square
- F clamps or quick clamp
- Protractor or angle rule
Can I Build a Glass Veranda?
Yes, you can build a similar structure but simply swap the polycarbonate sheets for glass. 10mm toughened glass would be required, which doesn’t cost much more that polycarbonate but you will need specialist equipment to lift these into place.
Check the weight of the glass beforehand to ensure the structure is suitable to support the additional weight. Additional supports might be required.
How Does a Veranda Hold up in a Storm?
This veranda is solid as a rock. It’s been through a number of storms and has recently seen Storm Darragh with wind speeds up to 90mph. Here’s a quick video mid storm to see what it’s like. No creaking, no knocking and no flexing of the polycarbonate sheets!
How to Maintain Your Veranda
It’s important to maintain your veranda to ensure it stays looking good and most importantly remains safe.
Wood care
Wood is a natural material and will rot if not cared for and treated annually. You should treat the wood with a suitable outdoor wood stain, paint or oil. You can find loads of suitable products at your local hardware store. Check regularly for rot or build-up of water in certain areas.
Cleaning the glass veranda
The roof will need to be cleaned regularly to ensure mould and moss don’t build up. I’ve found that it can be quite tricky reaching onto the veranda so I invested in a long cleaning pole.
Telescopic Window Cleaning Kit

- Kit comes with an 12ft (3.6m) extension pole. Included in the kit are a 25cm squeegee, gooseneck adapter and a user manual.
- EXTENSION POLE: The 3.6m pole is extensible to 3.6m(12ft) and collapsed to 148cm approx. weight of 700g
- LENGHT ADJUSTMENT: By using the segment clamps, you can adjust the pole length to your needed reach high surface. The pole is adjustable from 1,46m to 3.6m at any position.
- The squeegee has a 25cm (10″) size and can be connected with the same click connector used for the water-fed brush. It features a LEFT-RIGHT adjusting mechanism that makes it easy to clean hard-to-reach areas.
I’ve also recently decided that a window cleaning robot would be a nice idea. I’m looking to get one of these in the future.
CHOVERY CL.1 Robot Glass Cleaner

- EXCELLENT PERFORMANCE AND UNIQUE DESIGN: This window cleaning robot has an exclusive patent and brand, small size, flexible operation, designed to facilitate customer operation and save time, and can clean every corner. Practical and safe.
- MULTI-LEVEL SECURITY PROTECTION SYSTEM: MEMS has a highly sensitive picture detection system that can identify and prevent obstacles automatically and intelligently. It has a built-in vacuum motor and strong adsorption. Built-in UPS (uninterrupted power supply) can prevent the robot from falling even when there is no power.
- DEEP CLEANING: Two circular spiral cleaning heads with washable microfiber pads can completely scrub the windows. The cleaning range is large, the highest is 6m and the widest is 5m. It is suitable for glass of various sizes and thicknesses (thickness 3 mm and above), with or without frame.
- EASY TO USE AND A VARIETY OF CLEANING MODES: You can choose 3 different cleaning modes, these modes can be cleaned automatically or manually controlled. AI Technology V2.0 can calculate the route and automatically clean the entire window. Window cleaning robots allow you to save more time.
Roof Access with a Veranda
A reader recently asked about roof access for general maintenance and solar panel installation so I thought I’d mention how we approached these.
Here’s an image where the scaffold company installed a bridging scaffold rig to provide full access to the roof for our solar panel access.

For other access, whether it’s to clean the panels or access the roof for general maintenance like tile repairs, ladder access might be key. Please note, it’s not overly difficult to remove the polycarbonate panels from the aluminium bars. Simply remove the caps, unscrew the tightening rail, and you can slide the sheet out. Then, it can easily be reinstalled after access to the roof is complete. You can also consider long cleaning poles for cleaning.
How much does a veranda cost?
This is a good question and not easy to give a straight answer. My veranda cost roughly £2260. This cost was determined by the size and roofing type I used for the project. You can build a veranda for under £500, but this will be smaller and use corrugated polycarbonate sheets for the roofing.
The cheapest roofing material you can buy that is suitable for a veranda is the corrugated polycarbonate sheets. I would advise buying the thicker type (1.3mm) as it will last longer and won’t make as much noise in heavy rain. It’s difficult to find these in your local hardware stores, so try online instead. I purchased mine here on eBay. Pricing for a 2.4m (8ft) sheet will be about £26.
My 3.6m (12ft) clear solid polycarbonate sheets at 5mm cost about £270 per sheet. In comparison, the corrugated sheets of a similar size will cost you £39 per sheet. That’s a big difference.
4 Years On: How Has the Veranda Held Up?
I built this veranda in 2022 and it’s now been through four full winters, including Storm Darragh, which brought wind speeds close to 90mph. Structurally it hasn’t moved. The posts are solid, the rafters haven’t shifted and the polycarbonate sheets are still sitting exactly where I installed them.
The maintenance has been straightforward. Once a year, I give the timber a coat of wood stain, the same Ronseal I used at the start. It takes a couple of hours and keeps the wood looking good. The polycarbonate roof gets a clean a couple of times a year using a long extension pole, or sometimes I climb up and stand on scaffold boards to give it a good scrub. Moss and algae do build up, particularly through winter, so it’s worth staying on top of it.
If I were building it again I’d do very little differently. The solid polycarbonate was worth the extra cost over corrugated sheets. Four years in and I’d make the same call.


How to Make Your Veranda Even More Amazing
A basic veranda will create an amazing outdoor living space but there are more options to really transform this space. Depending on your imagination you could consider one of the following:
- Add an outdoor heater or two. Keep warm whatever the weather with an electric or gas heater.
- An open fire pit. These are great features that can help you keep warm, provide an open grill for cooking or simply roasting some marshmallows.
- Add plants. Using tiered plant stands or hanging plants assists with the use of space without adding clutter.
- Build a pizza oven. A pizza oven is a nice addition for those who love to cook outdoors.
- An outdoor kitchen. You could go as far as adding an outdoor kitchen to your veranda for the full blown outdoor cooking experience.
- Decorate with custom plates. Add personality and charm to your veranda by using vintage-style or personalised metal number plates. A number plate maker can create unique designs that reflect your style, perfect for mounting on walls, beams, or fences to add a rustic or industrial touch to your space.
- Swinging benches and chairs. Relax and unwind with a swing seat or bench.
- Blinds. Protect yourself from the sun with manual or automatic blinds. We added a simple shade sail as a cheaper alternative.
- Festoon lighting. This kind of lighting can really make your veranda pop and provide suitable light for later evening enjoyment.
- A log burning stove. Keep warm with a log burning stove and flue system.
- Hanging plant baskets. Brighten up the place with plants, flowers and foliage.
Find a Veranda Kit
If you don’t have the desire to build this veranda from scratch then you can buy kits online. All the materials come pre-cut so all you have to worry about is the construction. Here a a couple of options for a pergola style canopy.

Final Word
A veranda is the fully roofed, house-attached version. A lean-to follows the same build method but is often simpler. A canopy can be fabric or solid-roofed. A pergola keeps the frame but opens the roof to the sky. Whatever you call yours, the construction approach in this guide covers the fundamentals.
A veranda (also spelt verandah), lean-to, pergola, canopy or outdoor covered area can provide a beautiful space in your garden that can be enjoyed all year round. It will also add value to your property and make it more appealing to any potential buyers. So it’s a no-brainer, really. Many may opt for a conservatory or extension to increase their living space, but for a fraction of the cost, you can achieve this veranda. Try adding more partitioning walls, comfortable furniture and an outdoor heater to make these types of structures even more livable during the colder months.


This looks just like the veranda I want to do.
With the costs for the clear polycarbonate versionn what size was it. I have a corner section of the house which would anchor three of the posts, but no concrete base for the 4th post.
I’m aiming for less than £1k total cosf.
Hi Edward. Mine is just over 4m wide and 3.6m deep. You can use other methods to anchor the 4th post to the ground. Consider creating a concrete platform or an EasyPAD system. You’ll just need to ensure the ground underneath is firm by digging down 300mm and filling with compacted Type 1 MOT.
Hi – Great guide. I built one referencing it. For the roof I got some toughened glass sheet but found it difficult to install. Got rid of them now and am looking for options. How are the 5mm polycarbonate sheets holding up? Would you use any different material if you were building this now?
Thanks.
Thanks for the feedback. I’m still really happy with the 5mm polycarbonate sheets. They hold up well in all kinds of weather. I’d happily make another one with the 5mm sheets. Glass was always my second option but like you say, so difficult to install. Maybe I’d also recommend getting a slightly thicker poly sheet if money weren’t an issue.
Really great build and very inspiring. Looking to build a veranda very soon and add some netting to section off part of it for covered area for the dog.
Was wondering about the planning permission side of things. Whenever I look on the planning portal, all I can find is the verandas are not covered by permitted development and nearest thing I can find to a veranda is an outbuilding or a car port which must be less than 2.5m height near a boundary (which would be no good for us as we have tall house windows so would need to build a fraction higher than 2.5) but then it claims we could build a conservatory which could be up to 3m! Very confusing.
Hi Rich. Yes it can be a little unclear what the specific rules are. I would call you local council and ask to be 100% sure. Some are stricter than others.
Ultimately, if your neighbours don’t have an issue with it you should be fine. But for peace of mind speak to the council.
All the best with your build.
Hi Ben,
Doing similar build, frame built and just about to order the roofing sheets. Worried about wind and snow load as in the Peak District. You added the perpendicular roof sheet supports using 25x50mm timber. Did you find guidance/advice on the how far apart this can be? Did you attach the sheets to this at all or just rest it on top? Any noise/rattle when windy? Many thanks – really helpful site. Top Work – Ross
Hi Ross, I’ve had this up since May/June this year and it’s proven to be very sturdy. We’ve only had one moderate storm in that time and it held perfectly still. No noise, rattle or movement. The ALUKAP bars do a great job of holding the roofing sheets still. I’ve tried to force them out of the holdings with a stick from underneath and I can’t physically do it. They’re very secure.
I live in Cornwall so snow isn’t something I generally have to worry about. If I were you I would go for slightly larger support beams between the main rafters. 25x50mm does seem a little small if snow were to build up on top.
The sheets are currently just resting on top of these support beams, with a rubber beading between them. Again, I’ve had no issues with noise etc. I did buy fixings to secure the roofing to the beams but decided not to use them as the sheets felt super secure and I wanted to avoid drilling into the sheets. You can find the fixings here if you decide to use them: https://amzn.to/3yxObrU
I didn’t find any guidance on the spacing for the support. It was much of a trial-and-error approach on the ground to see how much flex there was. I found that 4 supports, equally spaced across the 3.6m length, with the 5mm sheets were about right.
Hope this info helps and good luck with your build. Shout if you have any further questions.
Ben
What an amzing job. I live in the windy north west of England. Have it been tested by this yet?
Hi. Thank you. Yes it’s been through a couple of windy storms now and is solid as a rock. The Poly sheets are fixed into the rails on either side and there is no movement in them. This should stand up to 100mph winds. Hope this helps.
Thanks, that has helped and I was hoping you’d say that about the noise.
Nice work on the blog by the way, it was a good read.
Thanks again 🙂
Hi Ben,
Nice Build! That’s pretty much what I’m planning on building, but have a couple of questions about yours before I start.
1. How did you apply the flashing?
It looks as though you must have climbed on top of the roof to apply it at the end. I’m thinking of applying it one meter at a time by leaning over after I install each roof panel.
2. What’s the rain noise like?
I know that it’s not great on the multiwall stuff compared to glass, but I’ve not used the solid clear stuff before. I’m just a bit concerned as the veranda will be over some patio doors connected to the living room.
Thanks.
Hi Pete, Thanks and good questions.
Q1. To apply the flashing I used a couple of long boards braced over the top of the veranda. I used wet towels to cushion the boards and prevent them from slipping away from underneath me. It was a bit sketchy but managed to complete the job. Your way could also work!
Q2. The solid polycarbonate is very similar to glass and noise is minimal. I’ve honestly not noticed it since I installed the veranda a couple of months ago.
Hope this helps,
Ben
Hi Ben,
Nice build!
This is pretty much exactly what I have planned to build, but have a couple of questions on yours before I proceed.
1. How did you apply the flashing after the roof was already up?
I was thinking of applying the flashing 1 meter at a time after fitting each sheet, but I can see from the pics that you didn’t do that. I’m guessing you had to climb on top of it which I don’t fancy trying.
2. How is the noise from the rain?
I know the noise on the double layer polycarbonate isn’t great, but I’ve no experience with the solid clear stuff (which is the material I’d rather use).
Thanks.
Hi Ben,
Do you know where I can get affordable 4m solid sheets? Generally the max I can find is about 3m and they are crazy expensive. I’ve tried the link above but roofingsuperstore don’t seem to sell them,
Cheers
Hi Tommy. Affordable isn’t a word I would associate with solid polycarbonate sheets. You can find the 4m x 1m sheets here: https://clearambershop.com/collections/axgard-solid-glazing-sheets/products/axgard-clear-5mm-uv-protected-glazing-sheet?variant=42022152634580
No it is not! Cheers pal, gonna start the frame before I make a final decision on the roofing. Will prob end up with multiwall or clear corrugated tbh. Solid looks so much better but so pricey.
Both yours look amazing btw – i’m pretty much hoping for a a carbon copy of your first one.
Thanks Tommy and good luck with your build!
Love this and want one for our garden. We are also in Cornwall (North) and the only reservation I have is the wind. Do you find any issue – you look fairly sheltered but our location is less so. Thanks very much.
Thanks Louise. I also have reservations about the wind. I’ve not had the chance to see how it fairs in strong winds yet so that test is still to come. The structure feels really strong and the polycarbonate sheets feel fixed in place so I think it will Withstand strong winds. I did buy some additional fixings for the sheets but decided not to use them. I can send you the link to them if you want?